005 Getting Started#
COM6018
Copyright © 2023–2025 Jon Barker, University of Sheffield. All rights reserved.
1. Introduction#
Welcome to COM6018 Data Science with Python.
In this module, we will be working in Bring Your Own Device (BYOD) labs. This means that it is important that you have a laptop that is set up with the necessary tools. In the session today, we will be going through the steps necessary to get you set up.
The steps we will be going through are:
Installing a Code Editor
Installing Python with
uvMy first Python Project
Installing
gitDeveloping with
gitBacking up to GitHub
For some steps, details will depend on your operating system. We will be covering Windows, MacOS and Linux. Where there are differences, we will highlight them.
It is possible that you already have a Python development environment set up. If you do, that is great! However, it is still worth going through the steps to ensure that you have everything you need for this module.
2. Installing a Code Editor#
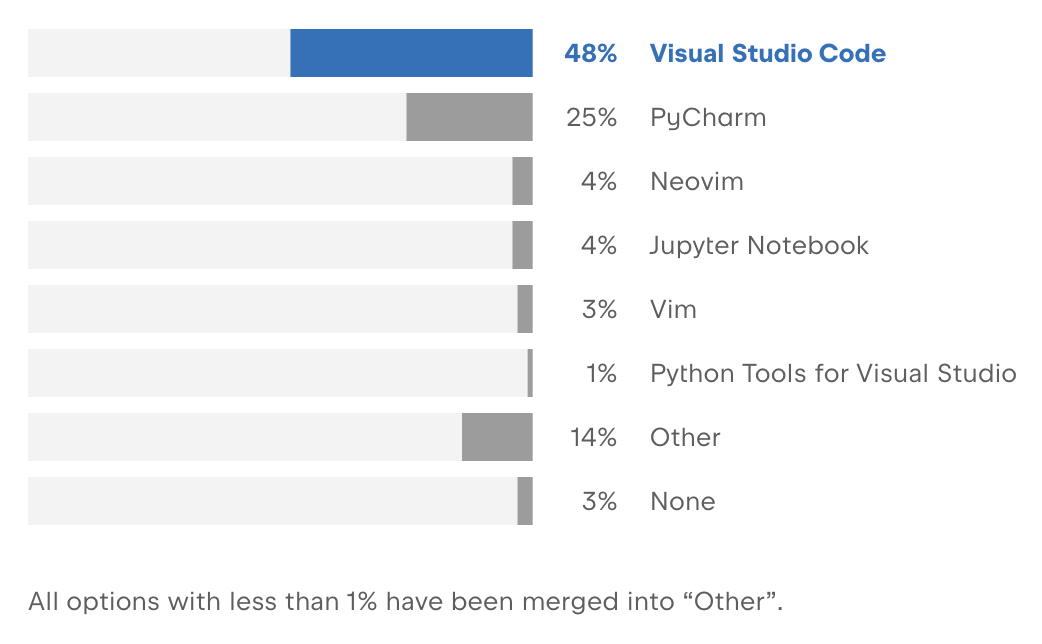
For developing Python programs you will need a good code editor. For COM6018, we are recommending that you use Visual Studio Code (more commonly known as ‘VS Code’). VS Code is developed and maintained by Microsoft but the core is open source and released under the MIT licence. It is free to use and it is by far the most popular editor among Python programmers used by 48% of Python developers. It provides a lot of handy tools that we will introduce during the module.
2.1 Installing VSCode#
Go to https://code.visualstudio.com/ and click the big Download button — it will automatically give you the correct installer for your operating system. After downloading, run the installer and follow the instructions.
2.2 Setting up VSCode for Python#
When you first open VSCode, it will probably prompt you to install the Python extension. If it does, please install it.
If it does not, you can install it by clicking on the Extensions icon on the left (it looks like four squares)
Fig. 2 The extensions icon in VS Code#
In the Extension Sidebar search for “Python”. The extension is made by Microsoft and has a blue icon with a white snake (see below). Once you have found it, click on it and then click the install button in the main window.
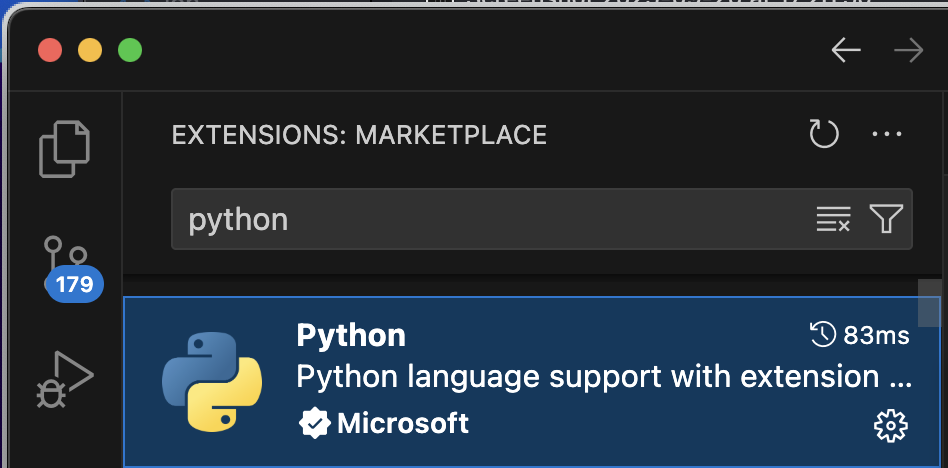
Fig. 3 The Python extension in VS Code#
You can also install the Jupyter extension which will allow you to work with Jupyter Notebooks inside VS Code. Search for Jupyter (see below) and install it in the same way. (We will be using Jupyter Notebooks in the lab classes next week).
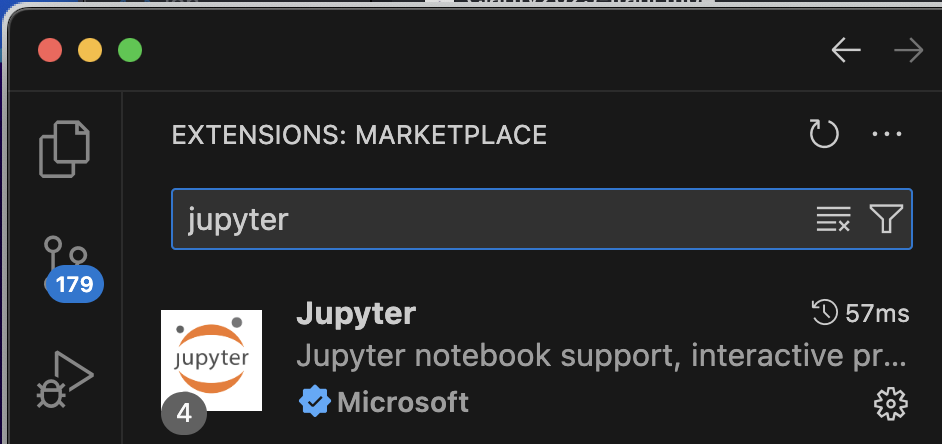
Fig. 4 The Jupyter extension in VS Code#
Tip
VS Code itself is distributed as a Microsoft product (not fully open source), but its core editor is open source. If you want to use a fully open source version of VS Code, you can install VSCodium. However, this will not support some of the Microsoft extensions such as the Python extension.
3. Installing Python with uv#
We will now install Python on your machine. We will be using the uv tool to manage Python versions and environments. uv is a simple tool that makes it easy to install and switch between different versions of Python. Using uv will also make it easier to manage dependencies for your Python projects. It will also make it easy for you to separate the Python version you use for this module from any other Python versions that you may have already installed on your machine.
3.1 Installing uv#
Installing uv will involve typing some commands into a terminal. If you do not know how to open a terminal, please ask for help.
Once you have opened a terminal, run the appropriate command below for your operating system.
Use curl to download the script and execute it with sh:
curl -LsSf https://astral.sh/uv/install.sh | sh
If your system doesn’t have curl, you can use wget:
wget -qO- https://astral.sh/uv/install.sh | sh
Use irm to download the script and execute it with iex, as follows:
powershell -ExecutionPolicy ByPass -c "irm https://astral.sh/uv/install.ps1 | iex"
Changing the execution policy allows running a script from the internet.
For more detailed instructions, please see the uv installation page at https://uv.pyenv.dev/en/latest/installation.html.
3.2 Installing Python with uv#
Python is an evolving language and a new version is released every year. For this module, we will be using Python 3.12. You can install this version of Python by running the following command in your terminal:
uv python install 3.12
You can check that it has installed by listing the installed versions of Python:
uv python list
You may be surprised to see that there are multiple versions of Python listed. Some machines have a system version of Python that is used by the operating system which uv will locate.
In general, there isn’t a single “best” version of Python to use — the right choice depends on your project. Older projects may require an older version of Python, while newer ones may need features available only in the latest releases. Although Python itself is designed to be backwards compatible, problems often arise because third-party libraries can lag behind: it may take time before they are updated to work with the newest Python versions. As a result, code that runs fine on an older version of Python may not yet be usable on the latest release if its dependencies have not caught up. It is therefore normal for Python developers to need to work with multiple versions of Python on the same machine. In the next section, we will see how this is made easy by using uv to maintain separate environments for each Python project.
3.3 Starting a new Python project#
Python programs typically rely on a large number of third-party libraries (also known as packages or modules). These libraries are not included with Python itself and need to be installed separately. In the COM6018 module, for example, we will be using libraries such as numpy, pandas, matplotlib and scikit-learn. These libraries all have frequently updated versions, and there are also dependencies between them and other libraries, .e.g. pandas depends on numpy. Further, each of your projects may have different requirements: i.e., different packages and different versions of those packages. This would lead to conflicts if you try to install everything into a single Python installation. For this reason, we keep each project isolated from each other by using separate project directories each of which will have a separate virtual environment.
We will start by making a new project for this lab session.
In your terminal, run the following commands (you haven’t got to type the lines starting with # — they are just comments to explain what the commands do):
# Make a new directory for your project
mkdir getting_started
# Change into that directory
cd getting_started
# Use uv to create a new 'project' in this directory
uv init
This makes a new directory and sets up uv to manage the project. To see what uv has done, you can list the files, including ``hidden` files by running.
ls -a
ls -Force -Name
This should output something like,
.git
.gitignore
.python-version
pyproject.toml
main.py
README.md
The most important of these is the pyproject.toml file. This is where uv will keep track of the Python version and the libraries that you install for this project. You can also edit it directly to add some project information.
If you open the pyproject.toml file in your code editor, you should see something like this:
[project]
name = "getting-started"
version = "0.1.0"
description = "Add your description here"
readme = "README.md"
requires-python = ">=3.8"
dependencies = []
You can edit the description field to add a description of your project if you wish.
3.4 Making the virtual environment#
We will now use uv to construct a virtual environment for this project. A virtual environment is a self-contained directory that contains a specific version of Python and all the libraries that you install for that project.
To create the virtual environment, run the following command in your terminal:
uv venv --python=3.12
When you run this you should see output like this:
Using CPython 3.12.6
Creating virtual environment at: .venv
Activate with: source .venv/bin/activate
The command has created a new virtual environment for the project using Python 3.12. The details of the environment are stored in a hidden directory called .venv.
Before you can use the virtual environment, you need to activate it. You can do this by running the command that uv has printed out, this will probably be:
source .venv/bin/activate
.venv\Scripts\activate
Important
You might find that the above command generates an error like this:
File C:\path\to\your\project\.venv\Scripts\Activate.ps1 cannot be loaded
because running scripts is disabled on this system. For more information,
see about_Execution_Policies at https:/go.microsoft.com/fwlink/?LinkID=135170.
If you see this it just means that your PowerShell is set to not allow scripts to be run. You can change this by running the command:
Set-ExecutionPolicy -ExecutionPolicy RemoteSigned -Scope CurrentUser
You will be asked to confirm the change, type Y and press enter. You should now be able to run the activate command.
We can check that the virtual environment is working correctly by checking the version of Python:
python --version
You should see that it is Python 3.12.x.
You can also check that the Python executable is the one in the virtual environment by running:
which python
where python
This should print out a path that ends with .venv/bin/python (or .venv\Scripts\python.exe on Windows).
You can also check that the default main.py Python program works by running:
python main.py
It should print out Hello from getting-started!.
Tip
There are tools that can update your prompt to show the name of the active virtual environment. This can be useful to avoid confusion about which environment you are using. If you want to do this, I recommend using Starship. It is easy to install and works with most shells and operating systems.
We will leave uv for now, but we will return to it later in the session when we need to install some libraries for the project.
4. Developing with Git#
In this module we will be teaching you how to use git and GitHub to manage your code development.
4.1 Installing Git#
You may already have git installed on your machine. You can check by running the following command in your terminal:
git --version
If you see a version number, then you have git installed. If you do not have git installed, or if the version is older than 2.0, then you will need to install it.
You can download git from https://git-scm.com/downloads. The instructions for downloading and installing will depend on your operating system. Ask for help if you need it.
Tip
If you are using a Mac, we recommend that you install git using the brew package manager for installing software tools. It can be installed using the instructions here. Once you have brew installed, you can install git by running the following command in your terminal:
brew install git
4.2 Git basics#
git is a powerful tool for managing code development. It allows you to keep track of changes to your code, collaborate with others, and manage different versions of your code.
We will be using git throughout the module, and you will need to use it for your assignments.
git stores your files in a ‘repository’ (or ‘repo’ for short). When you make changes to your files, you can commit those changes to the repository. You can think of this as taking a snapshot of your files at a particular point in time.
The commit process involves two steps:
First, you
stagethe changed files that you want to include in the commit. This is done using thegit addcommand.Second, you
committhe staged changes to the repository using thegit commitcommand. When you perform the commit, you include a shortcommit messageto describe what the changes were for.
The advantage of the two stage process is that if you have changed a lot of files, you can split the changes into multiple commits. This can be useful because you can later review your commit history to get a clear understanding of how your code has evolved over time.
Git has a lot of powerful features that allow you to manage code development and collaborate with others. Features such as branching, merging, and pull requests are beyond the scope of this introduction, but we will be covering them later in the module. Most importantly, git allows you to roll back to previous versions of your code if you make a mistake or if you want to try out a new idea without affecting your main codebase. Further, in combination with the cloud-based GitHub service, it allows you to securely back up your code.
4.3 Making your first commit#
To make a new git repository for a project, you would normally run the command git init in the project directory. However, if you have already run uv init to set up the project, then uv will have already created a git repository for you. You can check this by running the command:
ls -a
ls -Force -Name
You should see a directory called .git. This is where git stores all the information about the repository.
You will also see a file called .gitignore. This file tells git to ignore certain types of file when you are staging changes. This is important because generally you only want to track changes to your source code and other human-generated files. You do not want to track changes to files that are generated by your system or large data files generated by your code. The .gitignore file created by uv is a good starting point, but you can always edit it to add more file types if you need to.
We can see a history of the commits that have been made by running the command:
git log
As we have not yet made any commits, you should see a message like, fatal: your current branch 'main' does not have any commits yet.
We can also check the status of the repository by running the command:
git status
If you do this you should see something like this:
On branch main

No commits yet

Untracked files:
  (use "git add <file>..." to include in what will be committed)
        .gitignore
        .python-version
        README.md
        main.py
        pyproject.toml

nothing added to commit but untracked files present (use "git add" to track)
This is indicating that nothing has been committed yet, and that there are new files that git is not yet tracking.
To make our first commit, we will first stage all the files in the project directory by running the command:
git add .
If we now re-run the git status command, we should see something like this:
On branch main

No commits yet

Changes to be committed:
  (use "git rm --cached <file>..." to unstage)
        new file:   .gitignore
        new file:   .python-version
        new file:   README.md
        new file:   main.py
        new file:   pyproject.toml
This is now showing that the files have been staged and are ready to be committed.
We can now commit the changes by running the command:
git commit -m "Initial commit"
The text after the -m is the commit message. It should be a short description of what the changes were for. For the first commit to a repository, a common message is “Initial commit”.
We will now re-run the git status command. You should see something like this:
On branch main
nothing to commit, working tree clean
This is telling us that the repo is up to date and nothing has changed since the last commit.
If you now run git log, you should see something like this:
commit c28f1ddb0245f81436b1aab4020355d4b486fad7 (HEAD -> main)
Author: Jon Barker <j.p.barker@sheffield.ac.uk>
Date:   Mon Sep 22 12:31:08 2025 +0100

    Initial commit
The git log will show a history of all the commits that have been made along with their commit messages. Currently there is only one. The first line of the log entry is the commit hash. This is a unique identifier for the commit. It is actually a SHA-1 hash of the contents of the commit. git uses hashing to keep track of changes to files and to ensure the integrity of the repository.
Note
If you are unfamiliar with the concept of hashing, don’t worry about it for now, just understand that the hash code uniquely identifies the contents of a file: if two files have different contents they will have different hash codes; if two files have the same hash code, you can guarantee that their contents is the same).
4.4 Making some changes#
Let’s now make some small changes to our files and save the changes by making another commit.
Edit the
README.mdfile in your code editor and add a line or two of text, e.g.# Getting Started This is my first Python project.Edit the
pyproject.tomlfile and change thedescriptionfield to something like:description = "My first Python project"
If you now run the git status command, you should see something like this:
On branch main
Changes not staged for commit:
  (use "git add <file>..." to update what will be committed)
  (use "git restore <file>..." to discard changes in working directory)
        modified:   README.md
        modified:   pyproject.toml

no changes added to commit (use "git add" and/or "git commit -a")
We will now stage the changes by using the git add command again. We could stage them individually like this:
git add README.md pyproject.toml
Alternatively, we can ask git to stage all the changed files by running:
git add -u
Once staged, we can commit the changes by running:
git commit -m "Updated README and project description"
You can now run git log again to see the commit history.
4.5 Recovering from mistakes#
We will now see how useful git can be for recovering from mistakes.
Let’s say that you have accidentally deleted your README.md file. You can simulate this by running the command:
rm README.md
If you now run git status, you should see something like this:
❯ git status
On branch main
Changes not staged for commit:
  (use "git add/rm <file>..." to update what will be committed)
  (use "git restore <file>..." to discard changes in working directory)
        deleted:    README.md
no changes added to commit (use "git add" and/or "git commit -a")
If you were not using git, it is possible that you would have permanently lost the file. Even if you are running a daily backup of your laptop, it would be very easy to lose a day’s work.
However, because we are using git, we can easily recover the file. We can do this by running the command:
git restore README.md
git will restore the file to the last committed version. If you now run git status again, you should see that the file has been restored and there are no changes to commit.
Note
Until recently, this would have been done using the command git checkout -- README.md. However, this command was confusing because it had multiple meanings depending on the context. The git restore command was introduced in git version 2.23 to make it clearer that we are restoring a file from the repository.
You could also use git restore if a file has been modified and you want to discard the changes and revert to the last committed version. This is very useful when programming. For example, you try to introduce a new feature, but you get things into a mess and want to start again from the last working version.
Note, git can only restore to versions of the files that have been committed. For this reason, it is important to commit your changes frequently. A good rule of thumb is to commit whenever you reach a logical stopping point in your work, e.g. when you have added a new feature, completed a small step, or fixed a bug. Professional developers will be making commits many times a day. For example, the repo I use to maintain the COM6018 module currently has over 200 commits.
5. Using GitHub#
GitHub is a cloud-based service for hosting git repositories. It provides a web-based interface for managing repositories, as well as additional features that extend git’s core functionality. GitHub is owned by Microsoft, but it is widely used by open source projects and private companies alike. It is free to make an account and we will be using a GitHub feature called GitHub Classroom to manage your assignments for this module.
In this section, we will make a GitHub account and then we will back up our getting_started project to GitHub.
5.1 Making a GitHub account#
If you already have a GitHub account, you can skip this step.
Visit the GitHub website at <github.com> and click on the “Sign up” button in the top right corner.
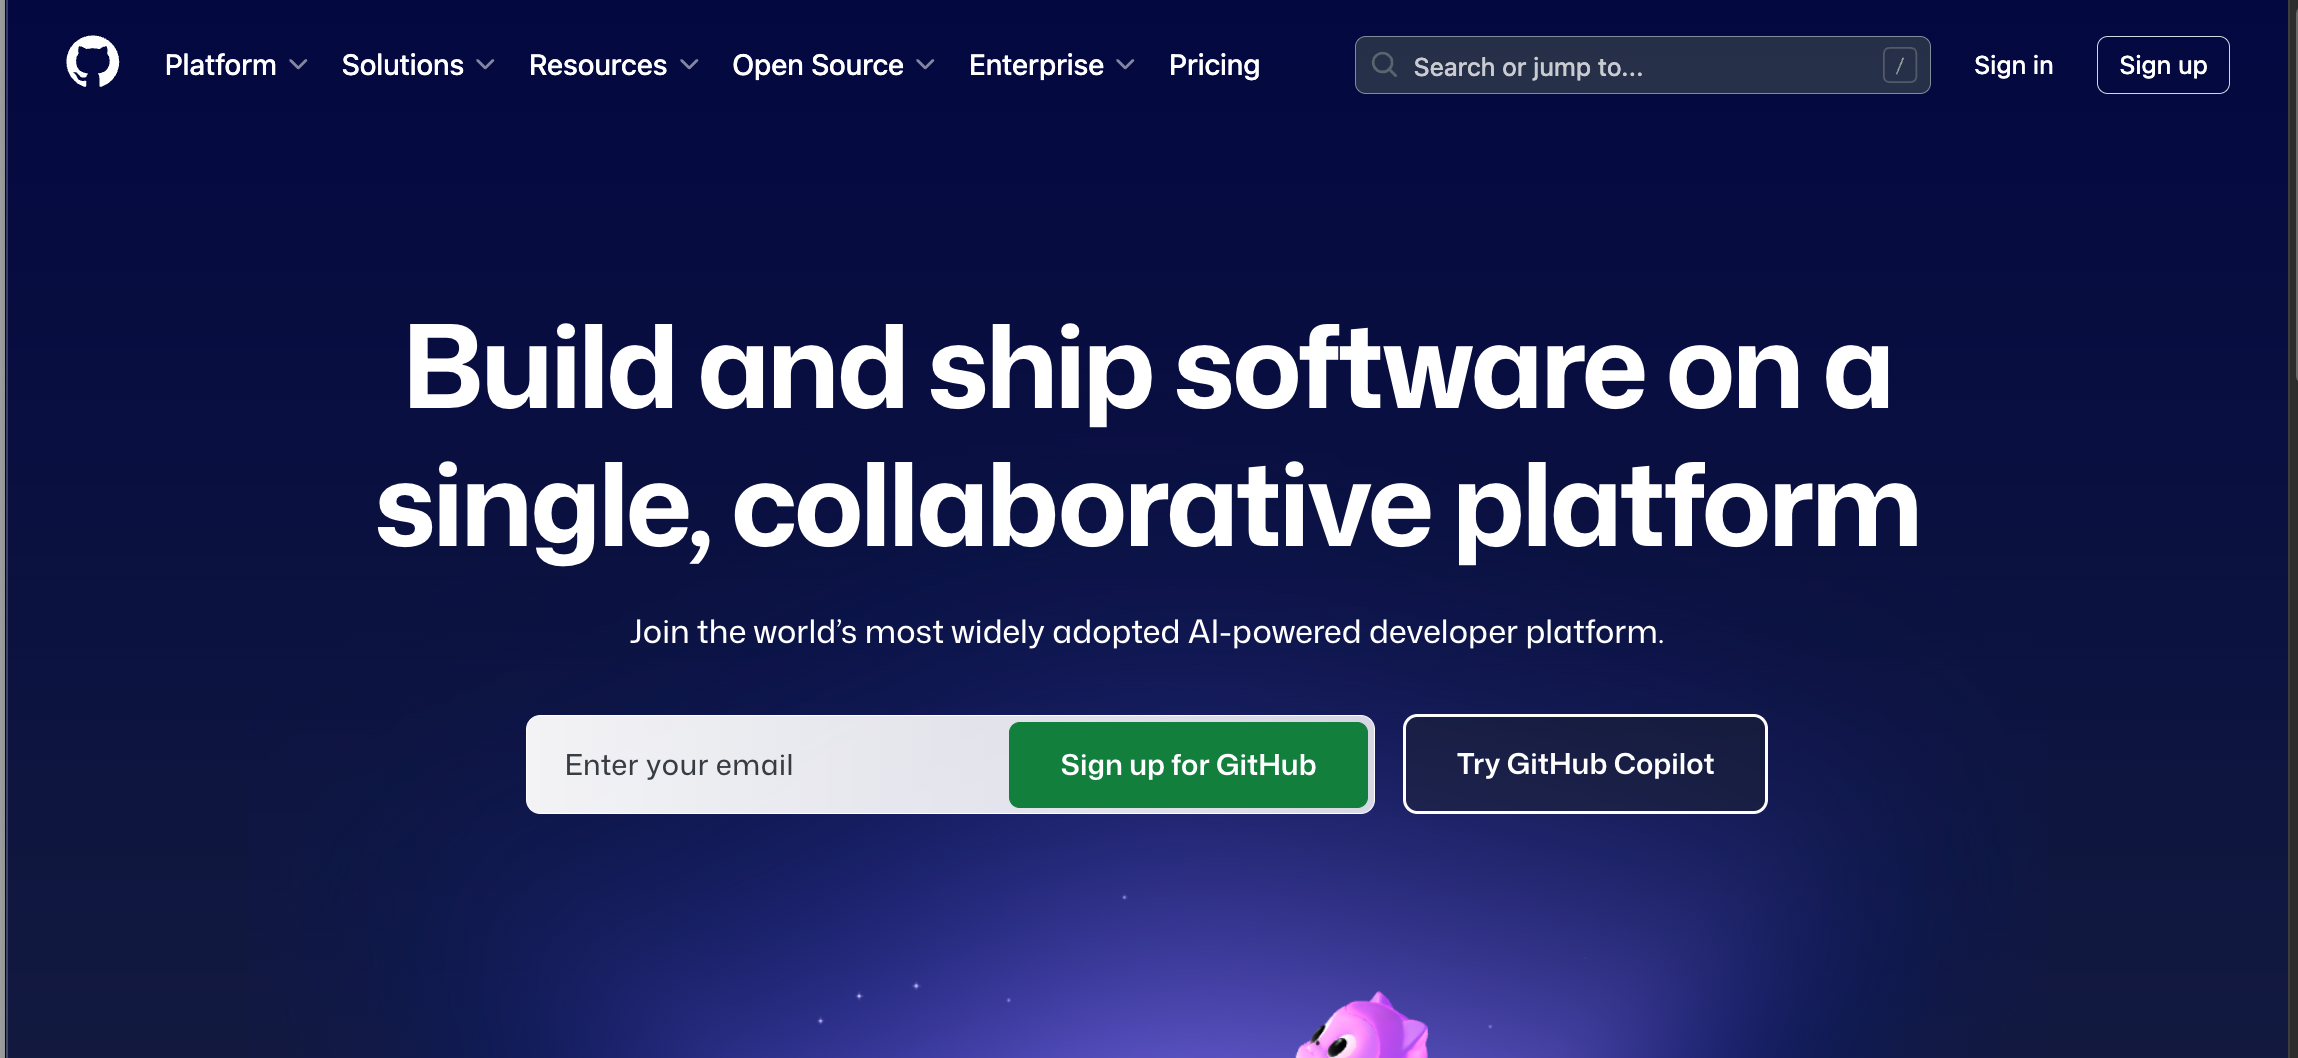
Fig. 5 A screenshot of the GitHub home page.#
Fill in the form to create a new account. You will need to provide a username, email address, and password. For the email address, use your University email address (you can always change it later, e.g. when you graduate). You must use a valid email address because GitHub will send you a verification code to complete the sign-up process.
5.2. Registering for GitHub Classroom#
Important
This step is very important as we will be using GitHub Classroom to manage your assignments for this module. We will need to register you with the COM6018 GitHub Classroom. We can only do this if you provide us with your GitHub username.
To register either use the link below,
👉 Click here to submit your GitHub username
Or use this embedded form:
Important
Please make sure to:
Double-check your GitHub username is spelled correctly
Submit the form as soon as possible after creating your GitHub account
5.3 Making a GitHub Personal Access Token (PAT)#
Before you can link your local repository to GitHub, you will need to create a personal access token. This is like a very secure password.
To create a personal access token, follow these steps:
In the upper-right corner of any page on GitHub, click your profile picture, then click Settings.
In the left sidebar, click Developer settings (at the bottom).
In the left sidebar, under Personal access tokens, click Tokens (classic).
Select Generate new token, then click Generate new token (classic).
In the “Note” field, give your token a descriptive name, e.g. “COM6018 token”.
In Expiration, select a token expiration. We recommend setting an expiration date for security reasons, but you can choose “No expiration” if you prefer.
Under ‘Select scopes’ check the box ‘repo’.
Scroll to the bottom and click ‘Generate token’.
On the next screen you will see the token.
Attention
Make sure to save a copy of the token. This will be your password when you push to GitHub. GitHub will not show it to you again. If you lose it, you will have to generate a new token.
5.4 Backing up your project to GitHub#
We are now ready to link our local getting_started project to GitHub. This involves creating a new ‘remote’ repository on GitHub and then pushing our local repository to the remote repository using the git push command.
On GitHub, make sure you are logged in and then click on the green Create repository button on the left hand side (see below).
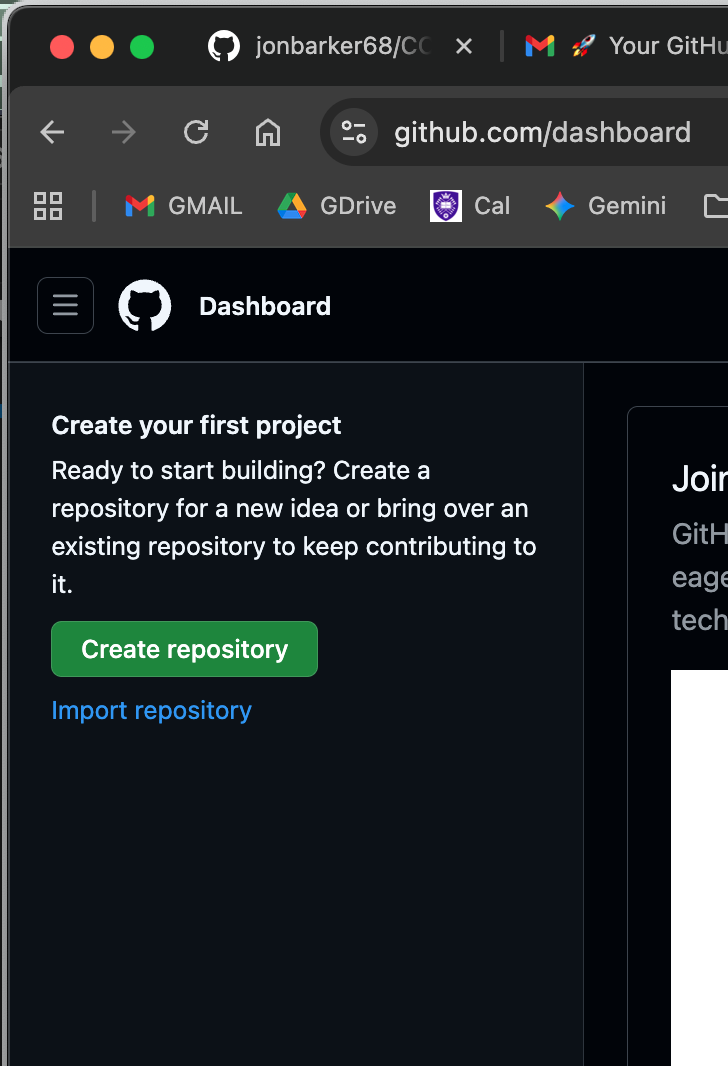
Fig. 6 A screenshot of the GitHub new repo button.#
You will then see a form like the one below.
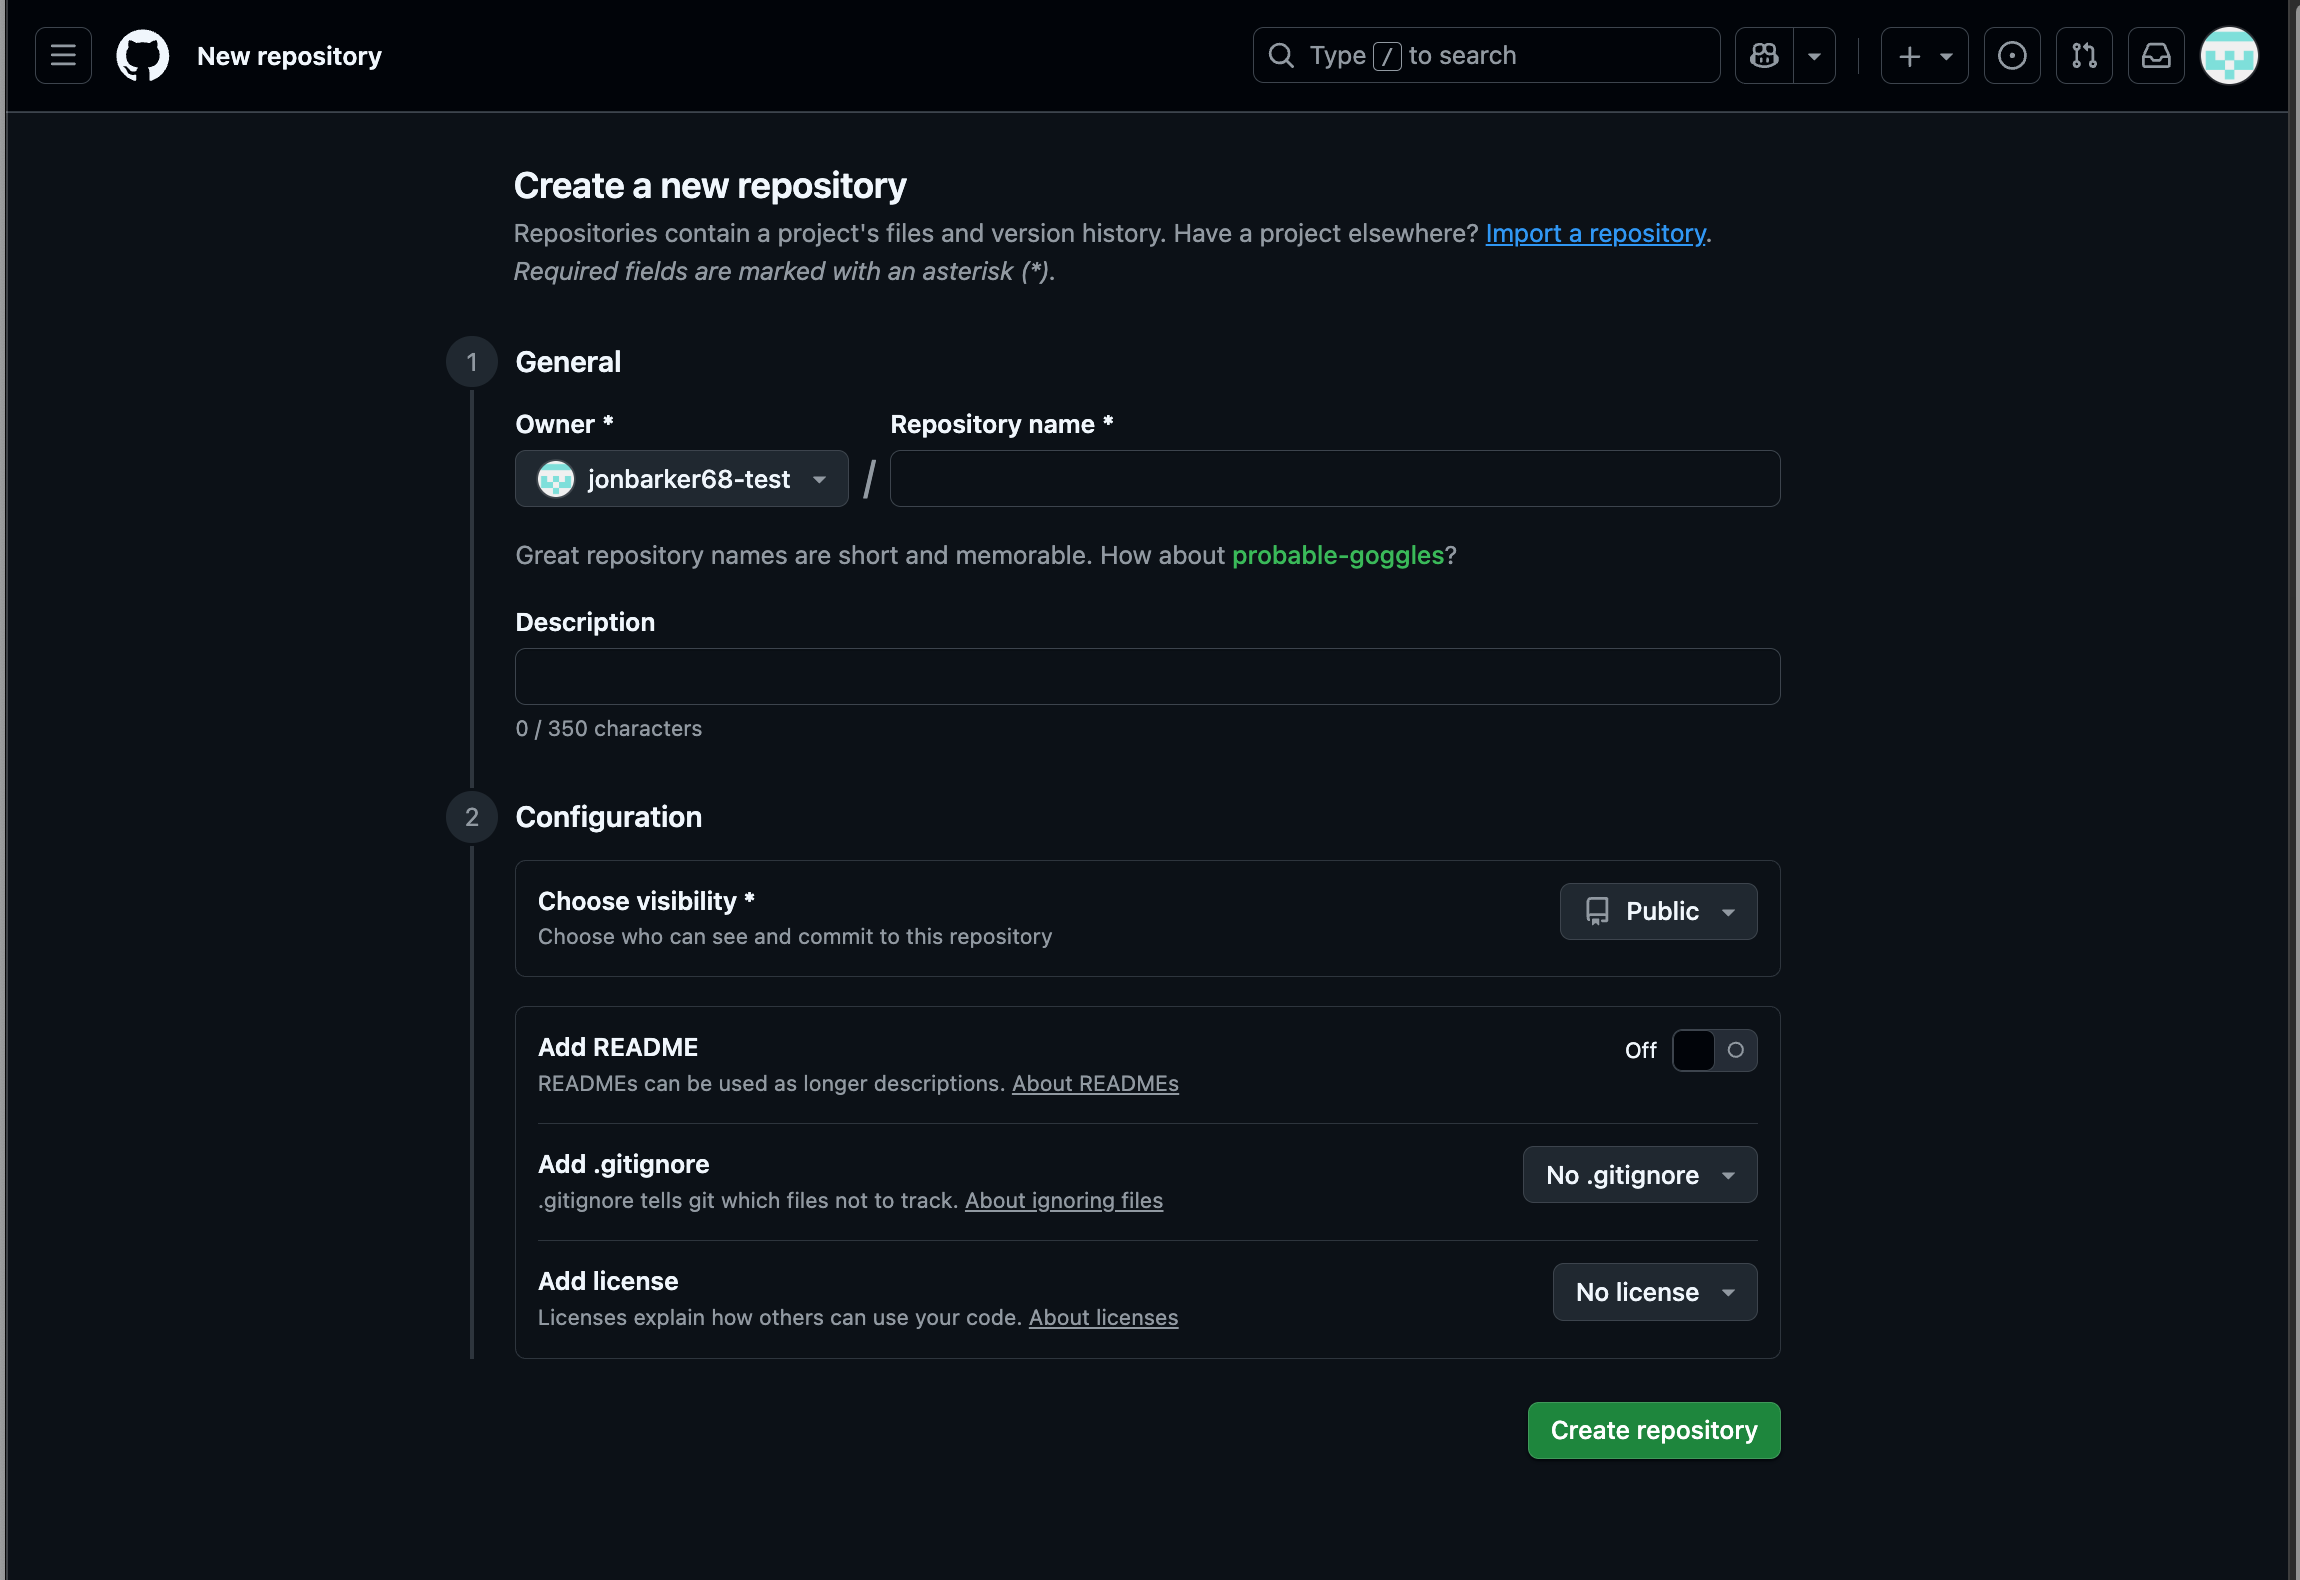
Fig. 7 A screenshot of the GitHub new repo form.#
Fill in the form using, “getting_started” as the repository name. You can add a description if you wish. Leave the other options as they are and then click the Create repository button at the bottom of the form.
This will create an empty repository on GitHub and take you to a page with instructions on how to link this to your local repository. You should see something like this:
git remote add origin <https://github.com/<YOUR_GITHUB_USERNAME>/getting_started.git>
git branch -M main
git push -u origin main
When you run this, the git push command will ask you for your GitHub username and password. For the username use your GitHub username, for the password paste the personal access token that you created in the previous section.
If all goes well, you should see output like this:
Enumerating objects: 11, done.
Counting objects: 100% (11/11), done.
Delta compression using up to 10 threads
Compressing objects: 100% (9/9), done.
Writing objects: 100% (11/11), 1.03 KiB | 1.03 MiB/s, done.
Total 11 (delta 2), reused 0 (delta 0), pack-reused 0 (from 0)
remote: Resolving deltas: 100% (2/2), done.
To https://github.com/jonbarker68-test/getting_started.git
 * [new branch]      main -> main
branch 'main' set up to track 'origin/main'.
Now, if you click on the Code tab button in your GitHub repository, you should see that your files have been uploaded to GitHub.
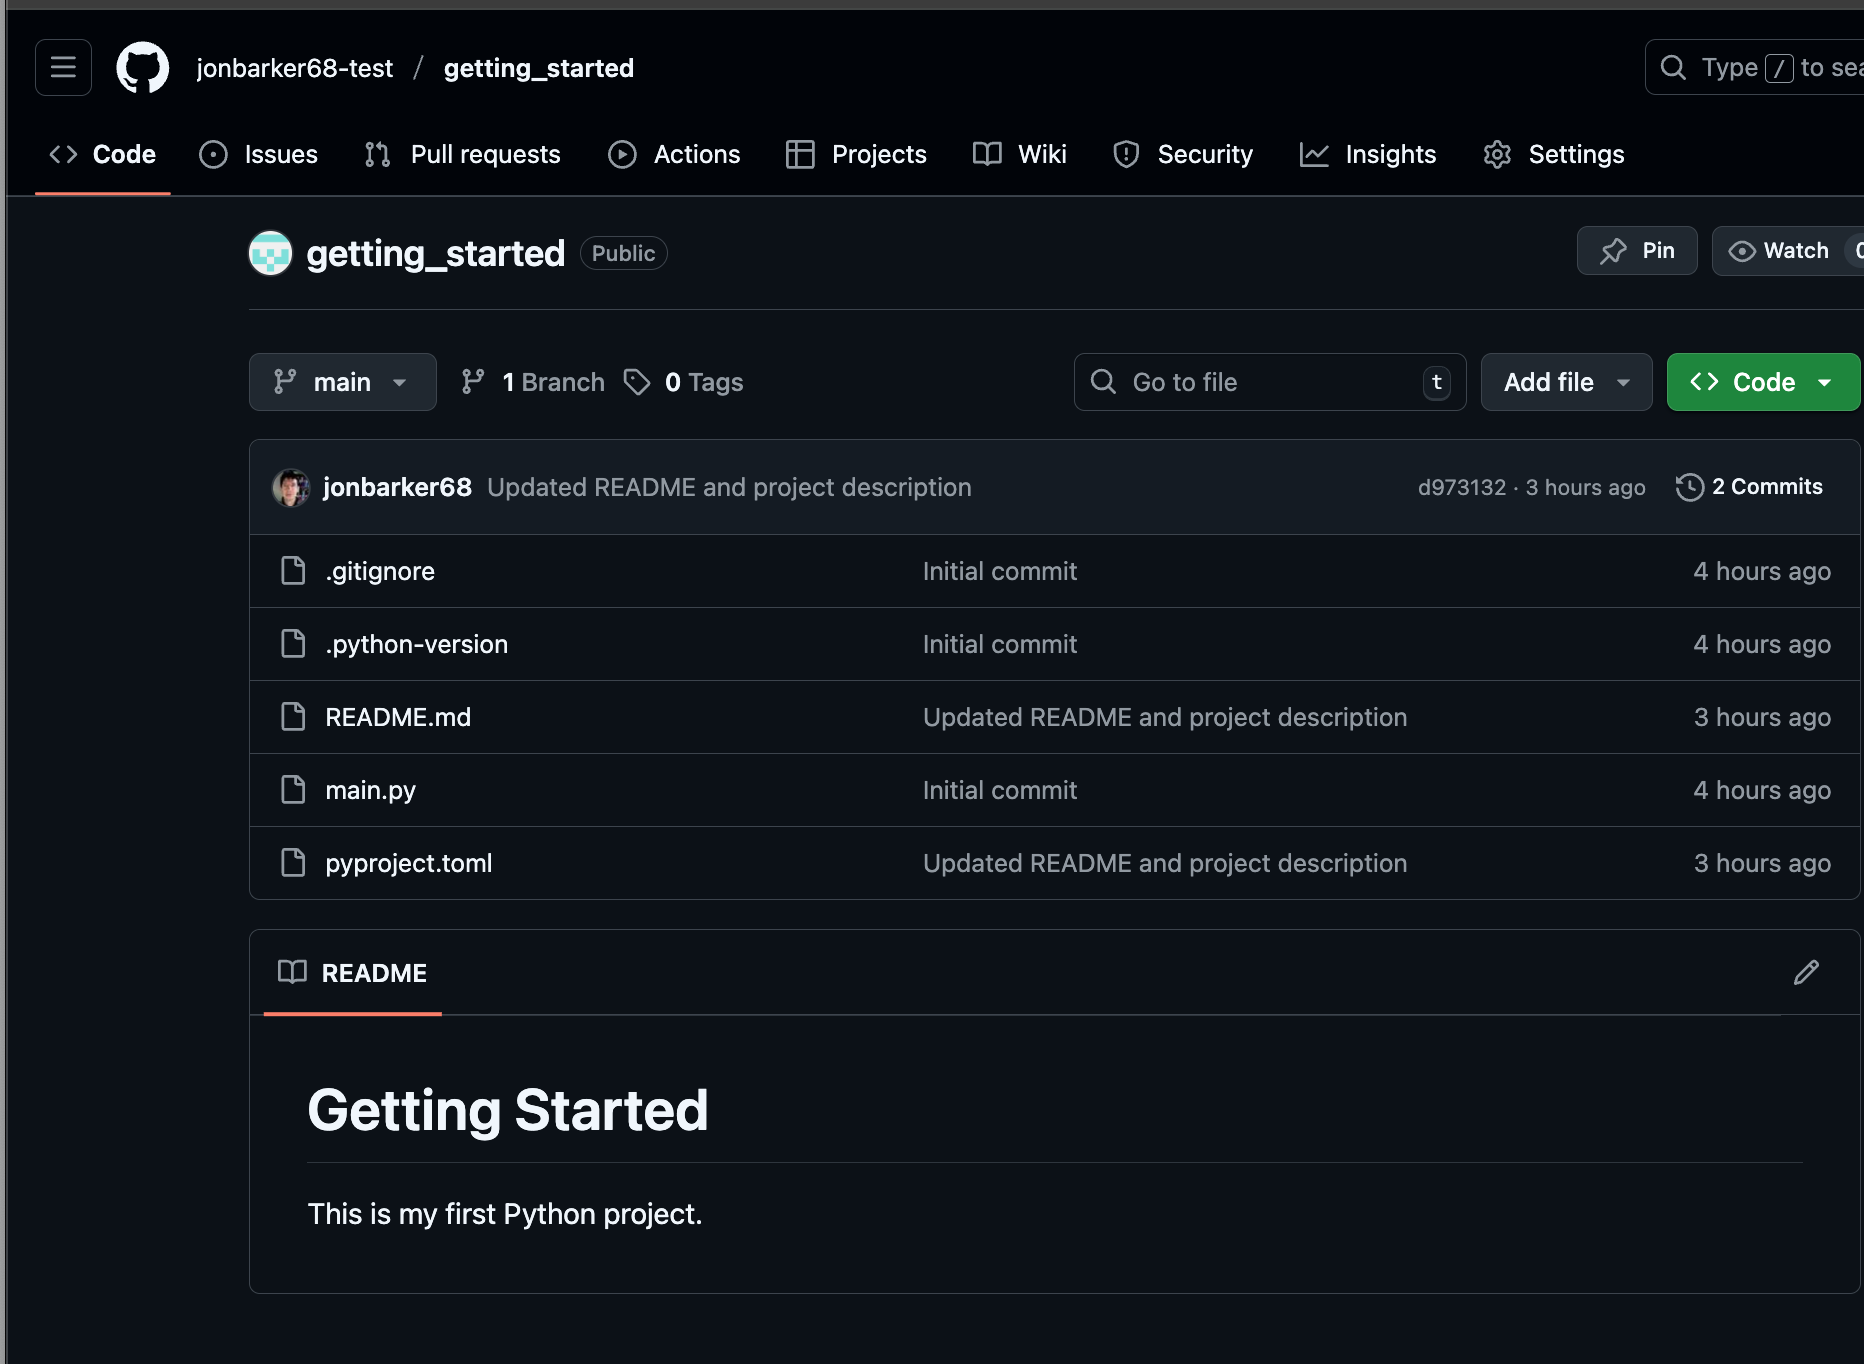
Fig. 8 A screenshot of the GitHub new repo with files.#
Note that the README.md file is rendered as a web page, i.e., any documentation you add to the README.md file will be displayed nicely on the GitHub page.
The README.md is a markdown file. Markdown is a simple way to format text using plain text syntax. You can learn more about markdown at https://www.markdownguide.org/basic-syntax/.
6. Our first Python program#
In this final section, we will use uv, Python and git to make a simple Python program that allows you to have a conversation with a cow! 😄 🐮
We will build the program in stages, committing our changes to git as we go along.
6.1 Step 1: Getting the cow to say something#
We will use a very powerful library called cowsay to make the cow speak. To install the library, we will useuv to add it to our project.
uv add cowsay
We will now write a simple Python program that uses the cowsay library to make the cow speak.
Using VS Code, use ‘New File…’ to create a new file called cowchat.py in the getting_started directory. Add the following code to the file:
import cowsay

cowsay.cow("Hello! Moo! Moo!")
Check that the code works by running the command:
python cowchat.py
If there are no errors, then we will commit the changes to git:
git add -u
git commit -m "Step 1: cow repeats the user input"
6.2 Step 2: Adding the looping logic#
Now return to VS Code and edit the cowchat.py file to add a loop that allows the user to have a conversation with the cow.
Edit the code until it looks like this:
import cowsay

cowsay.cow("Hello! Moo! Moo!")

while True:
    input_text = input("Chat, or type 'quit': ")
    if input_text.lower() == "quit":
        cowsay.cow("Goodbye! Moo! Moo! Moo!")
        break

    cowsay.cow(input_text + " Moo!")
Again, check that the code works by running the command:
python cowchat.py
If it works, then commit the changes to git:
git add -u
git commit -m "Step 2: Added looping logic for conversation"
6.3 Step 3: Making the AI-powered cow#
Note
Running the AI-powered cow in Step 3 uses the torch and transformers libraries.
On some laptops, especially older ones, this may run slowly or use a lot of memory.
Don’t worry if it doesn’t work smoothly — you can skip Step 3 and still complete all the other parts of this lab.
We will now use a powerful language model to make the cow more intelligent. We will use the transformers library from Hugging Face to access a pre-trained model called blenderbot. This is a small model that is suitable for running on a laptop.
First we need to install the transformers library. We will also need to install the torch library which is a dependency of transformers. We can do this by running the command:
uv add transformers torch
Now edit the cowchat.py file to use the transformers library to generate responses from the cow. Change the code so that it looks like this:
import cowsay
from transformers import pipeline

gen = pipeline("text2text-generation", model="facebook/blenderbot_small-90M")

cowsay.cow("Hello! Moo! Moo!")

while True:
    input_text = input("Chat, or type 'quit': ")
    if input_text.lower() == "quit":
        cowsay.cow("Goodbye! Moo! Moo! Moo!")
        break

    # prompt the model to role-play as a cow
    prompt = f"Pretend you are a cow. Answer the following question: {input_text}"
    response = gen(prompt, max_length=200)
    response_text = response[0]["generated_text"] + " Moo!"

    cowsay.cow(response_text)
Tip
If you want to be lazy, you can click the ‘copy’ icon in the top right corner of the code block above to copy the code to your clipboard. You can then paste it into the cowchat.py file in VS Code.
You can now run the code again by running the command:
python cowchat.py
Note
The first time you run the code, it will download the model from the Hugging Face model hub. This may take a few minutes depending on your internet connection. The model will be cached on your machine so that it does not need to be downloaded again.
Disclaimer 🐮
This talking cow is powered by an AI model. Sometimes it may say things that are a bit odd, silly, or even controversial. These do not reflect the views of the instructor or the University — please take everything the cow says in good humour!
If it works, then commit the changes to git:
git add -u
git commit -m "Step 3: Added AI-powered responses using transformers"
Now that we have finished the program, we will push the changes to GitHub by running the command:
git push
You can push changes as often as you like. It’s a good idea to get into the habit of pushing your changes often. I typically push my changes after every commit.
It is instructive to look at the commit history on GitHub. You can see how the project has evolved over time. You can also see the diffs for each commit which show exactly what changes were made. Type,
git log
It is also instructive to look at the pyproject.toml file to see how uv has kept track of the dependencies for the project. Open the pyproject.toml file in VS Code and look at the dependencies field. You should see something like this:
[project]
name = "getting-started"
version = "0.1.0"
description = "My first Python project"
readme = "README.md"
requires-python = ">=3.8"
dependencies = [
    "cowsay>=6.1",
    "torch>=2.5.1",
    "transformers>=4.46.3",
]
Note that uv has automatically added the dependencies for the libraries that we have installed. It has also added version constraints to ensure that we always use a version of the library that is compatible with our code.
7. Summary and Next Steps#
In this lab you:
Set up your coding tools
Installed VS Code and added the Python + Jupyter extensions.
Installed Python 3.12 using the uv tool.
Created your first Python project
Used uv init to start a project folder.
Made a virtual environment with uv venv to keep project dependencies tidy.
Learned the basics of git
Made your first commit.
Practised staging, committing, and restoring files.
Linked your project to GitHub so it’s safely backed up.
Built your first Python program
Got a cow to say hello with the cowsay library. 🐮
Added a loop so you can chat until you type quit.
Connected the cow to an AI model using Hugging Face’s transformers, so it can generate fun replies.
In the weeks ahead, we will build on these skills. Next week we will be exploring the Python language in more depth, and we will be using a tool called Jupyter Notebooks to write and run Python code interactively in the lab classes.
Important - Next Step
The lectures, lab classes, code examples and assignments are going to be made available via GitHub. If you haven’t done so already, please complete the form in Section 3 so that we can collect your GitHub username and give you access to the course materials.
📚 Further Reading (Top 4)#
Python Tutorial (official docs) A gentle introduction to Python basics.
VS Code Documentation How to use VS Code effectively, including extensions and Git integration.
uv Documentation Learn how
uvhelps manage Python versions, environments, and dependencies.GitHub Git Cheat Sheet (PDF) A one-page summary of the most useful Git commands.
Copyright © 2023–2025 Jon Barker, University of Sheffield. All rights reserved.